Categories: all aviation Building a Biplane bicycle gadgets misc motorcycle theater
Fri, 04 Mar 2022
The End of an Era (and the Beginning of Another)
As I write this, I am sitting in a cut-rate motel near Lakeland, FL. I have finally seen, in person, my new airplane. It is lovely. It is a biplane. It is a Marquart Charger. I'll take a test flight tomorrow, and sign all the documents to make it mine.
I knew when I bought Norbert the Champ that it wouldn't be my airplane forever. I knew it was something of a starter plane, though I didn't have a specific path forward in mind. I kind of figured I'd end up selling it to get an IFR-capable plane, so I could get my instrument license to facilitate flying down to visit my parents more often.
The thought of replacing it with a Charger is pretty damn cool.
But it brings to mind all the neat stuff I've done with Norbert. We flew to Oshkosh, spending three weeks traveling most of the way across the country, and seeing the world's biggest airshow. That was 2019. Before that, in 2017 and 2018, we did two big trips to California, one of them to visit my brother in LA, the other to visit my cousins in the Bay Area, and my friend Alex in Humboldt.
I've taken Norbert up to the San Juan islands more times than I can count. I've flown many friends (though not lately), taking them up for a little trip somewhere (out to the northwest tip of the state, at Quillayute, or up to the islands, or down to Olympia to pick up a friend just so we could go up to Port Townsend for pie). So much pie. I have eaten so much Spruce Goose Cafe pie because of Norbert.
In many ways, it is an ideal little plane for me. It's small and unimposing. It's slow, but also docile and forgiving, and kind when the pilot might not be the most coordinated klutz in the sky. It's classy looking, in its way, with the poorly conceived but very attractive black and green dope (lovely to look at, but exactly the same colors as the scene of a crash in so many places around the PNW where there are trees, making perfect camouflage; the opposite of what you want in a rescue situation). It's very well-equipped, now that I've had my nefarious way with it: a new ADS-B transponder, a new radio, and a new engine monitor, plus it's been well kept up and stored in a very protected hangar. I like to think, even electronic toys aside, that I'm selling it on better than I found it.
For that is the final calculus: I must sell Norbert the Champ. I'll have a for-sale page up soon. I can't afford to keep two airplanes, so the old one has to make space for the new one. It's been a very good plane for me, and I will always regret letting it go, but I would also regret letting this new Charger get away, and it offers me a great set of new opportunities, chief among them having an actual living, breathing Charger to examine to see how it's built; and giving me the opportunity to build up hundreds of hours on a Marquart Charger, making the first flight of the Charger I'm building much less of an Event than it might otherwise be.
So it is with great fondness that I consider this to be the final days of my time with Norbert the Champ. We've done wonderful things together, and I know you will go on to the next owner who will discover all the wonder and happiness to be had by puttering about the sky at a leisurely 85 MPH.
Posted at 17:49 permanent link category: /aviation
Sat, 19 Feb 2022
Building a Biplane: The Technical Counselor Shuffle
When I started on this idea of building a biplane, five years ago, I had done a bunch of research into the process. Not just the technical stuff like how to glue things together, or how to weld, but also the administrative process. The government, and therefore the FAA, runs on paperwork, so I looked into the paperwork.
One of the things that was supremely unclear to me, and remained unclear until just very recently, was essentially, "Who makes sure this thing is safe to fly?"
The logical answer should be, "The FAA." Like, that's their job, right, to make sure that the magical mystery contraptions don't fall down on the heads of unsuspecting people on the ground? Turns out, yes, but also no.
The advice I read from EAA and knowledgeable people was surprisingly vague. "Get a few signatures from an EAA Technical Counselor, or a DAR, in the log, over the course of your build," was generally what I understood. That's just weird. The FAA is all about rules. I'm not allowed to fly my Champ one minute past legal sunset, because it doesn't have a blinky light on it. Hard rules and firm lines and clear expectations are the order of the day. If I exceed the expiration date of my medical by one day, I am 100% not allowed to pilot an airplane.
So, it was always frustrating to me that this idea of "Who checks to make sure you're not building a death trap" was so poorly defined, so hazy and shrouded in mystery. After a tragicomic run-in with the Aeromedical division early in my flying career, I was keen to follow every rule I could find to the strictest letter of the law.
It turns out that I had the wrong idea. The FAA, with the Experimental - Amateur Built category (which my Charger will fall into when it's registered) explicitly doesn't worry about whether your death trap will fly or not. It's experimental. It might indeed not fly, but that's not really their problem. It's your problem. You, the builder (and presumptive pilot) need to make sure it's safe and airworthy.
If you think it's built well enough, that's good enough. If you want to get some external folks in to look it over and make sure you're not committing any blunders, that's probably good, but the FAA doesn't require it. They put up a framework around the category, called the testing phase, which sets out limits designed to avoid killing anyone but the pilot, if the builder's estimation of airworthiness was wrong: for some number of hours, you have to fly in a specific area, doing specific things, and that area is always away from people and things that might go foom if your engine dies, or the wings fall off.
And the FAA definitely cares about seeing your logs, your paperwork. They want to make sure you're not violating the rule that says, in order to qualify as Amateur Built, it had to be built by an amateur, for at least 51% of the work. So you can't hire in a crew of experienced aircraft builders to make your fancy execjet, and circumvent the certificated rules. If a commercial operation makes the plane, it has to go through the right set of rules, and the bar for that is much, much higher.
With all that in mind, I was much more easy-going about my recent Technical Counselor visit.
Shay, from my local EAA chapter, is a newly minted Technical Counselor, and I was actually his first TC project visit. He's an experienced Airframe and Powerplant mechanic, and teaches A&P students, although he's not an expert on wood wings or rag-and-tube construction like the Charger uses. Nevertheless, he'd have a decent idea of things that look wrong, so it was excellent to have him over to check out my in-progress wing.

Shay and Tom discussing a point of wing assembly difference
between Charger and Starduster
The visit itself was convivial, and along with Tom (who's building a Starduster Too, nearing the point of rigging everything up), we looked over the wing. It was mostly show-and-tell for me, as I got to point out all the cool stuff about the build so far, show off the special tools I've made, and generally brag about what I've done to people who understand everything I'm saying (I love to show it all off to non-aviation friends as well, but explaining the details of wing construction gets esoteric pretty quickly).
Thanks to over-enthusiastic requests on my part, I've actually got a second TC showing up this weekend, and I'm excited to see what he discovers on the wing, and what suggestions he may have for me. Shay gave me good advice about safety-wiring, which was very welcome, and provided a welcome sounding-board for things I'd been pondering.
In summary and in conclusion, the only person who legally cares about the actual airworthiness of your experimental plane is you. Get a second set of eyes on it, whether the FAA requires it or not. Someone else is always going to see things in a different way from you, and that can only benefit the quality of your build.
Posted at 01:49 permanent link category: /charger
Mon, 07 Feb 2022
The weather was stunning yesterday, so I ended up taking a lot of pictures when I flew to Friday Harbor. I laid them all out in a sort of photo essay. Enjoy!
A Lovely Flight to Friday Harbor One Sunday
Posted at 11:54 permanent link category: /aviation
Sat, 17 Apr 2021
Building a Biplane: One Thousand Hours
As of about 10:30 this morning, I passed the 1000 hour mark on my Marquart Charger biplane build.
As milestones go, it's not terribly exciting, in real terms. I was working on attaching the pivot brackets to the aileron spar, and taking my sweet time about it -- two hours to drill six holes, but I was quite interested in them being exactly right, so that when the aileron swings up and down, it doesn't bind. It's a bit of a trick, with three completely separate pivot points on a piece of wood, but I figured it out.
When I started this project in earnest in 2017, I was optimistically hoping I might see it finished in 5-7 years, but that changed to 7-10 years, then 10 years, and now I tell people ten to twenty years to completion. If you look at the Hours Spent By Month chart on the build dashboard, you'll see that I had a few good months in 2017, but 2017 and 2018 were fairly lackluster for actual time spent on the build. Then 2019 was completely absent, and when the pandemic hit in 2020, my time spent suddenly explodes.
Chances are decent that I'll be fully vaccinated within 3 months, and I wonder what that will do to my dedication to this project. I know I'll keep working on it, but I don't know if social engagements will slowly creep in and start eating up the time I would otherwise spend in the shop. That could slow my pace considerably, but it might be good for my sanity.
Another complicating factor, as far as predicting my pace, is that I'm breaking a lot of new ground right now, as I assemble my first wing panel. I'm cracking new problems and working out new procedures. I'm having to order stuff I hadn't already predicted I'd need. But, once I feel reasonably confident with what I'm doing, I have a feeling the subsequent wing panels will go a lot faster. Sure, it'll take me several hundred hours to put together this panel, but panel #2 might go together in a hundred hours, or it's possible it might take just as long. I don't know.
I also need to keep in mind that those thousand hours I've spent have almost all been productive time: I have nearly all the parts built and ready to assemble for all four wings. Assembling the pieces goes a lot faster, since I've effectively been building a big wing kit. As I learn from the first wing, I reduce the things that will slow me down for the next wing.
The things I'm aware of that aren't done at this point is a fairly small list:
- Need to build four more aileron rib tails, due to a misunderstanding about how they were being used
- Need to re-paint a bunch of brackets, now that I have the technique figured out
- Although I made templates for cutting the upper wing trailing edge/handhold pieces, that's not sorted out yet
- Fuel tank area and wing root fittings still need to be sorted out
- Sorting out the aileron control rods on the lower wings is probably going to be a whole thing
- Leading edge plywood needs to wait until the wings can be assembled to the fuselage
Ok, so it looks bigger when I write it out, but compared to making all the ribs, the wedge blocks, and jigging/welding/painting the wing brackets, it's not bad.
The big thing that happened recently is that I decided it was safe to finally glue the ribs to the wing spars. That's a huge step, because once you do that, it becomes a lot harder to work inside the wing. Suddenly all these ribs are in the way, and can't be conveniently slid out of the way. However, it was time, and once it happened, it unlocked all these other tasks. With the ribs fixed in position, I can install filler blocks between the ribs, I can make the ailerons (which have matching ribs that should line up with the wing's rib positions), and I can install the fuel tank area plywood. I've actually punted on the fuel tank area for the moment, until I can deal with the wing root fittings. I messed up and attached too-thick plywood to the wing roots, and have to deal with that before I can proceed.
The ability to move on to all these little jobs has been very freeing, and as a result I've felt much more productive. Before the ribs were glued down, I basically spent two weeks examining the plans and the wing from every possible angle, trying to figure out whether I was ready. It was time well spent, since it appears I didn't leave anything that needed to be done undone, but it felt like fairly unproductive time.
In any case, the arbitrary milestone of 1000 hours has come and gone, and I'm making good progress. Hopefully by the time another thousand hours has passed, I'll be done with wings, and working on the fuselage.
With any luck, I can keep up something like this pace. I've worked 625 hours in the last year, an average of 1.71 hours per day. I'd like to average 2 -- if I could do that, I'd make it to 5000 hours in just under five and a half years. Even if I stick with 1.7, that would only be six and a half years. Still, I think I'll keep telling people ten to twenty years. You never know when life will get in the way.
Posted at 23:33 permanent link category: /charger
Tue, 09 Mar 2021
Building a Biplane: My First Completely Failed Process
When I embarked on this project of building a biplane, I was pretty sure that I'd be making some parts over and over until I got it right. I wasn't sure what they'd be, but I'd heard too many tales of people making things three and four times until they got it right to imagine that I'd escape a similar fate.
Up until this point, I've been remarkably lucky, and have not actually produced very much scrap. Of course, the streak had to end.

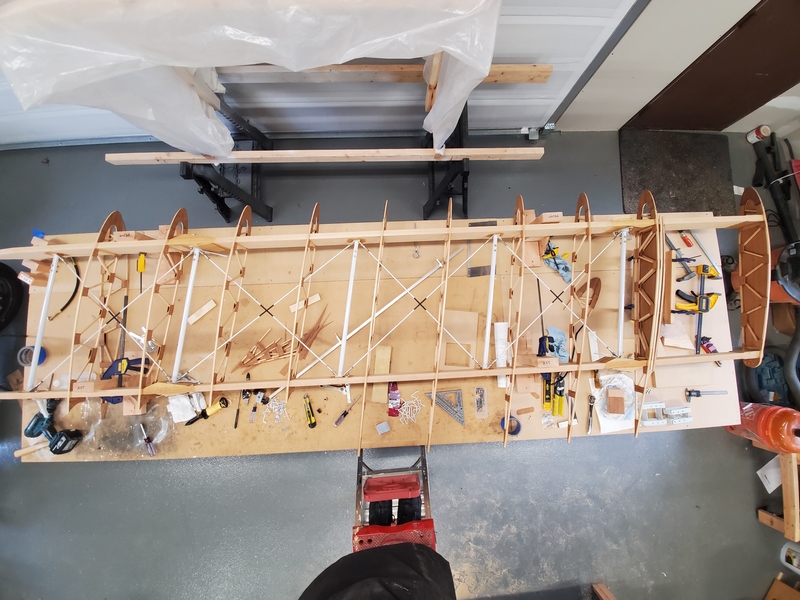
The wing, being constructed
I have finally reached the point of doing something that utterly failed, and had to be done over. It's just not quite what I'd expected.
I made the somewhat unconventional choice to do my painting with Stewart Systems' paint, which is uses water as a thinner, either waterborne, or actually water based. It's not that the Stewart Systems paint is better or worse, but it is definitely different than the solvent-based paints most people are used to. But I really liked the idea of not shooting actual poison into the atmosphere if I could avoid it.
So, I picked up a quart of the primer, and a quart of their two-part acrylic for the various steel parts that go inside the wings.
The basic problem I had, though, was that I had no clue what I was doing. Paint has always been a weak point with me, and I had questions about everything: tools to use, techniques to use, how to prepare the surface, how to even mix and apply the paint. So, I turned to a variety of sources trying to find out more.
I watched what seemed like the obvious videos Stewart Systems had produced, but they were heavily focused on either large aluminum surfaces, or on fabric. Good stuff, but not really applicable to spraying little tiny steel pieces, and even then, surprisingly light on the details I was looking for. I consulted with folks on the Biplane Forum, including one guy who worked in the automotive paint industry for his whole career, and who was acknowledged as the all-winning expert on anything paint.
Multiple people told me that if he said something, it was gospel, and so I followed his every word. I didn't implement everything he said (though I was planning to do so eventually), particularly on the "buy the best tools" front: in painting a bunch of 1" by 3" brackets, I couldn't see spending the money on a $1000+ compressor and $300 spray gun, though they will definitely be in my arsenal when it comes time to paint bigger things.
He gave me lots of hints and pointers that helped me along: how to use aluminum welding rod to make little fixtures to hang the tiny brackets from, how to set up an outdoor painting booth for painting small things, a good degreasing mixture, and so on. Good surface prep ideas. Which Scotchbrite to use, and which not to use.
Of course, I had to integrate all this advice with the sometimes contradictory advice I was getting about this water-borne paint I was planning to use. This is where the true problems arose, as it turned out.

The paint booth, under typical working conditions
I set up in my little paint booth with my cheap Harbor Freight "HVLP" gun, powered by my old underpowered pancake compressor, got the brackets nicely sanded and degreased, and laid on some primer and paint. I was extremely careful after they were painted, knowing that the paint wouldn't be as durable as the powder coated parts I had. I took my fresh-painted steel parts, and started installing them into the wing, and it was pretty cool: having these lovely shiny things installed into an actual identifiable airplane part was very satisfying.
However. (You knew this was coming. It's right there in the title.)

The "sidewise glance chipped it" tab
I noticed one of the wire tabs (the aforementioned tiny steel brackets) had a big chip out of it. I didn't recall even touching that tab with anything except gloved fingers. Other tabs showed raised paint where the compression tubes pressed on them. As careful as I was being, the painted surfaces took a bad beating, and it became obvious that the paint wasn't sticking very well. Maybe even at all.
Finally, I disassembled all the steel parts from inside the wing, and decided I'd have to repaint everything that was painted -- at this point, just the wire tabs, but I also needed to paint the compression tubes, and the drag wires, and I didn't want to have to redo them.

Look at the size of those paint flakes!
When I went to get rid of the old paint, it was shockingly easy to pull off huge leaves of paint, and it appeared that the primer almost uniformly failed to stick to the steel. Like, at all. It was real bad. I only dealt with the tabs for this wing, but it's clear I'm going to have to redo all the painted parts now, and that time and effort was completely wasted.
In my effort to figure out what went wrong, I went over the procedure I'd followed:
- Sand parts with 220 grit sandpaper (Stewart Systems suggestion)
- Wire the small parts up with aluminum wire hangers (forum suggestion)
- Degrease with naphtha/acetone mix (forum suggestion)
- Spray multiple fog coats as Stewart Systems directs
- Spray a final wet coat as Stewart Systems directs
- Keep parts was warm as possible (Stewart Systems says 70° F or more, but it was in the 40s)
In the mean time, I'd watched some more Stewart Systems videos, and came across one that looked super generic, but ended up being full of really useful information, and which helped show me some of the spots I'd gone wrong.
Stewart Systems recommends, in their printed materials, that steel parts be sandblasted, and that they be cleaned and degreased only with their detergent (ie, water-based) cleaner, and then a wipe with 91% isopropyl alcohol just before painting.
I didn't have access to a sandblaster, so I'd called their tech support line, and got the advice to use 220 grit sandpaper, which now seemed rather ill-considered, since it left the metal more polished than "toothy" like their paint would need to stick. I had taken the forum's advice on the degreaser (the rationale being that alcohol, which had been my first choice, would evaporate too fast, and promote rust). My attempts to spray light fog coats and wet coats were somewhat thwarted by poor lighting: most of my build time, particularly in winter, happens when it's fully dark out, and my sole source of light was a very bright but single-point worklight.
So, I'd left the surface nicely polished, with a possible residue of solvent on it, and for some reason the water-based primer, which needs a mechanical (rather than chemical) bond, didn't stick very well. Weird.

Wire tabs, now nicely sandblasted
As a result, I've spent the last week or so cleaning up my parts, sandblasting them with my new sandblasting setup (since it was clearly necessary), and cleaning them with the approved EkoClean detergent and 91% alcohol before spraying them with a series of more-or-less fog coats of primer. Before and after painting, the parts live in my unexpectedly useful Easy Bake™ Rib Oven, which has been converted with spots to hold painted parts, keeping their temperature in the mid 70s.
Initial signs are positive, but I won't know until the final coat of paint is on and dry. Even then, apparently it takes about a month for the Stewart Systems paint to fully cure, so attempting to put pressure on the parts (ie, install them in the wing) before then will probably cause it to buckle again.
However, if it works out, I will at least know how to approach repainting all the other pieces. (This time around, I only dealt with the hardware for this wing, so I could prove the process before wasting a lot more time.) Here's hoping I got it right this time.
Posted at 22:28 permanent link category: /charger
Tue, 19 Jan 2021
Building a Biplane: Build Order
When I started on this whole biplane wheeze, one of the first questions (after "Which one to build") was what order to build things in. There are basically two answers to this question, broadly speaking: you can build the fuselage first, or you can build the wings first. The fuselage is a welded steel structure that will be about 18 feet long, two feet wide, and three feet tall when it's assembled. The wings are four 12 foot long, 5 foot wide, 9 inch thick wooden structures composed of thousands of little sticks glued together, more or less.
I decided to build wings first, because I was more comfortable working in wood, basically. At the time, I didn't know how to weld, and had few metalworking tools that would be useful for building the fuselage. The wings were the obvious choice.

The first rib I built, waiting for gussets
When building the wings, the first thing you build is wing ribs. This is a great place to start, because buying all the materials costs only a few hundred dollars (building a plane is a many tens-of-thousands of dollars investment, so this is indeed a very low-commitment way to start). Building the jig on which a rib is assembled is fairly straightforward, and the only complicated part to build at this point is the rib noses, which are funny-shaped pieces of plywood, which I ended up cutting on a router using a template double-stick taped to the roughed-out plywood shape.
To be sure, there are many factors that go into building ribs, it's not a simple process. But it's also not terribly hard, and because it's so low-commitment, you can get a good taste for Building Life, and see if it's really for you. In my case, it was, and I carried on.
I got a little ahead of myself as I drew to the close of the rib project, and ordered my spars. I'm not sad I did, as it took a long time for them to arrive (most of a year), but I had some other things I needed to tackle before the spars came into play.
In addition to ribs, the wings of a Marquart Charger are composed of a number of welded brackets, compression tubes, crisscrossing drag and anti-drag wires or strips, and a bunch of wedge blocks. Those brackets have to be painted or powder coated. You also need a bunch of AN hardware (fancy bolts) and turnbuckles (for drag strips) or clevis fork rod ends (for drag wires). Once you have all these things gathered together, you can start actually assembling a wing.

Many of the brackets that go into building a Charger wing (these
are brackets for all four wings, not just one)
This, broadly, is the process I'm in the middle of now. I've welded and painted all the brackets. I've made the compression tubes and have the drag wires started. I've cut all the wedges, in a cloud of shredded spruce. On the first day of December, 2020, I threaded the wing ribs onto the spars and began my wing build.
Thus I come to the point of this entry: listing out all the operations that go into assembling a wing, once you've made all the component parts.
Cutting the Spars
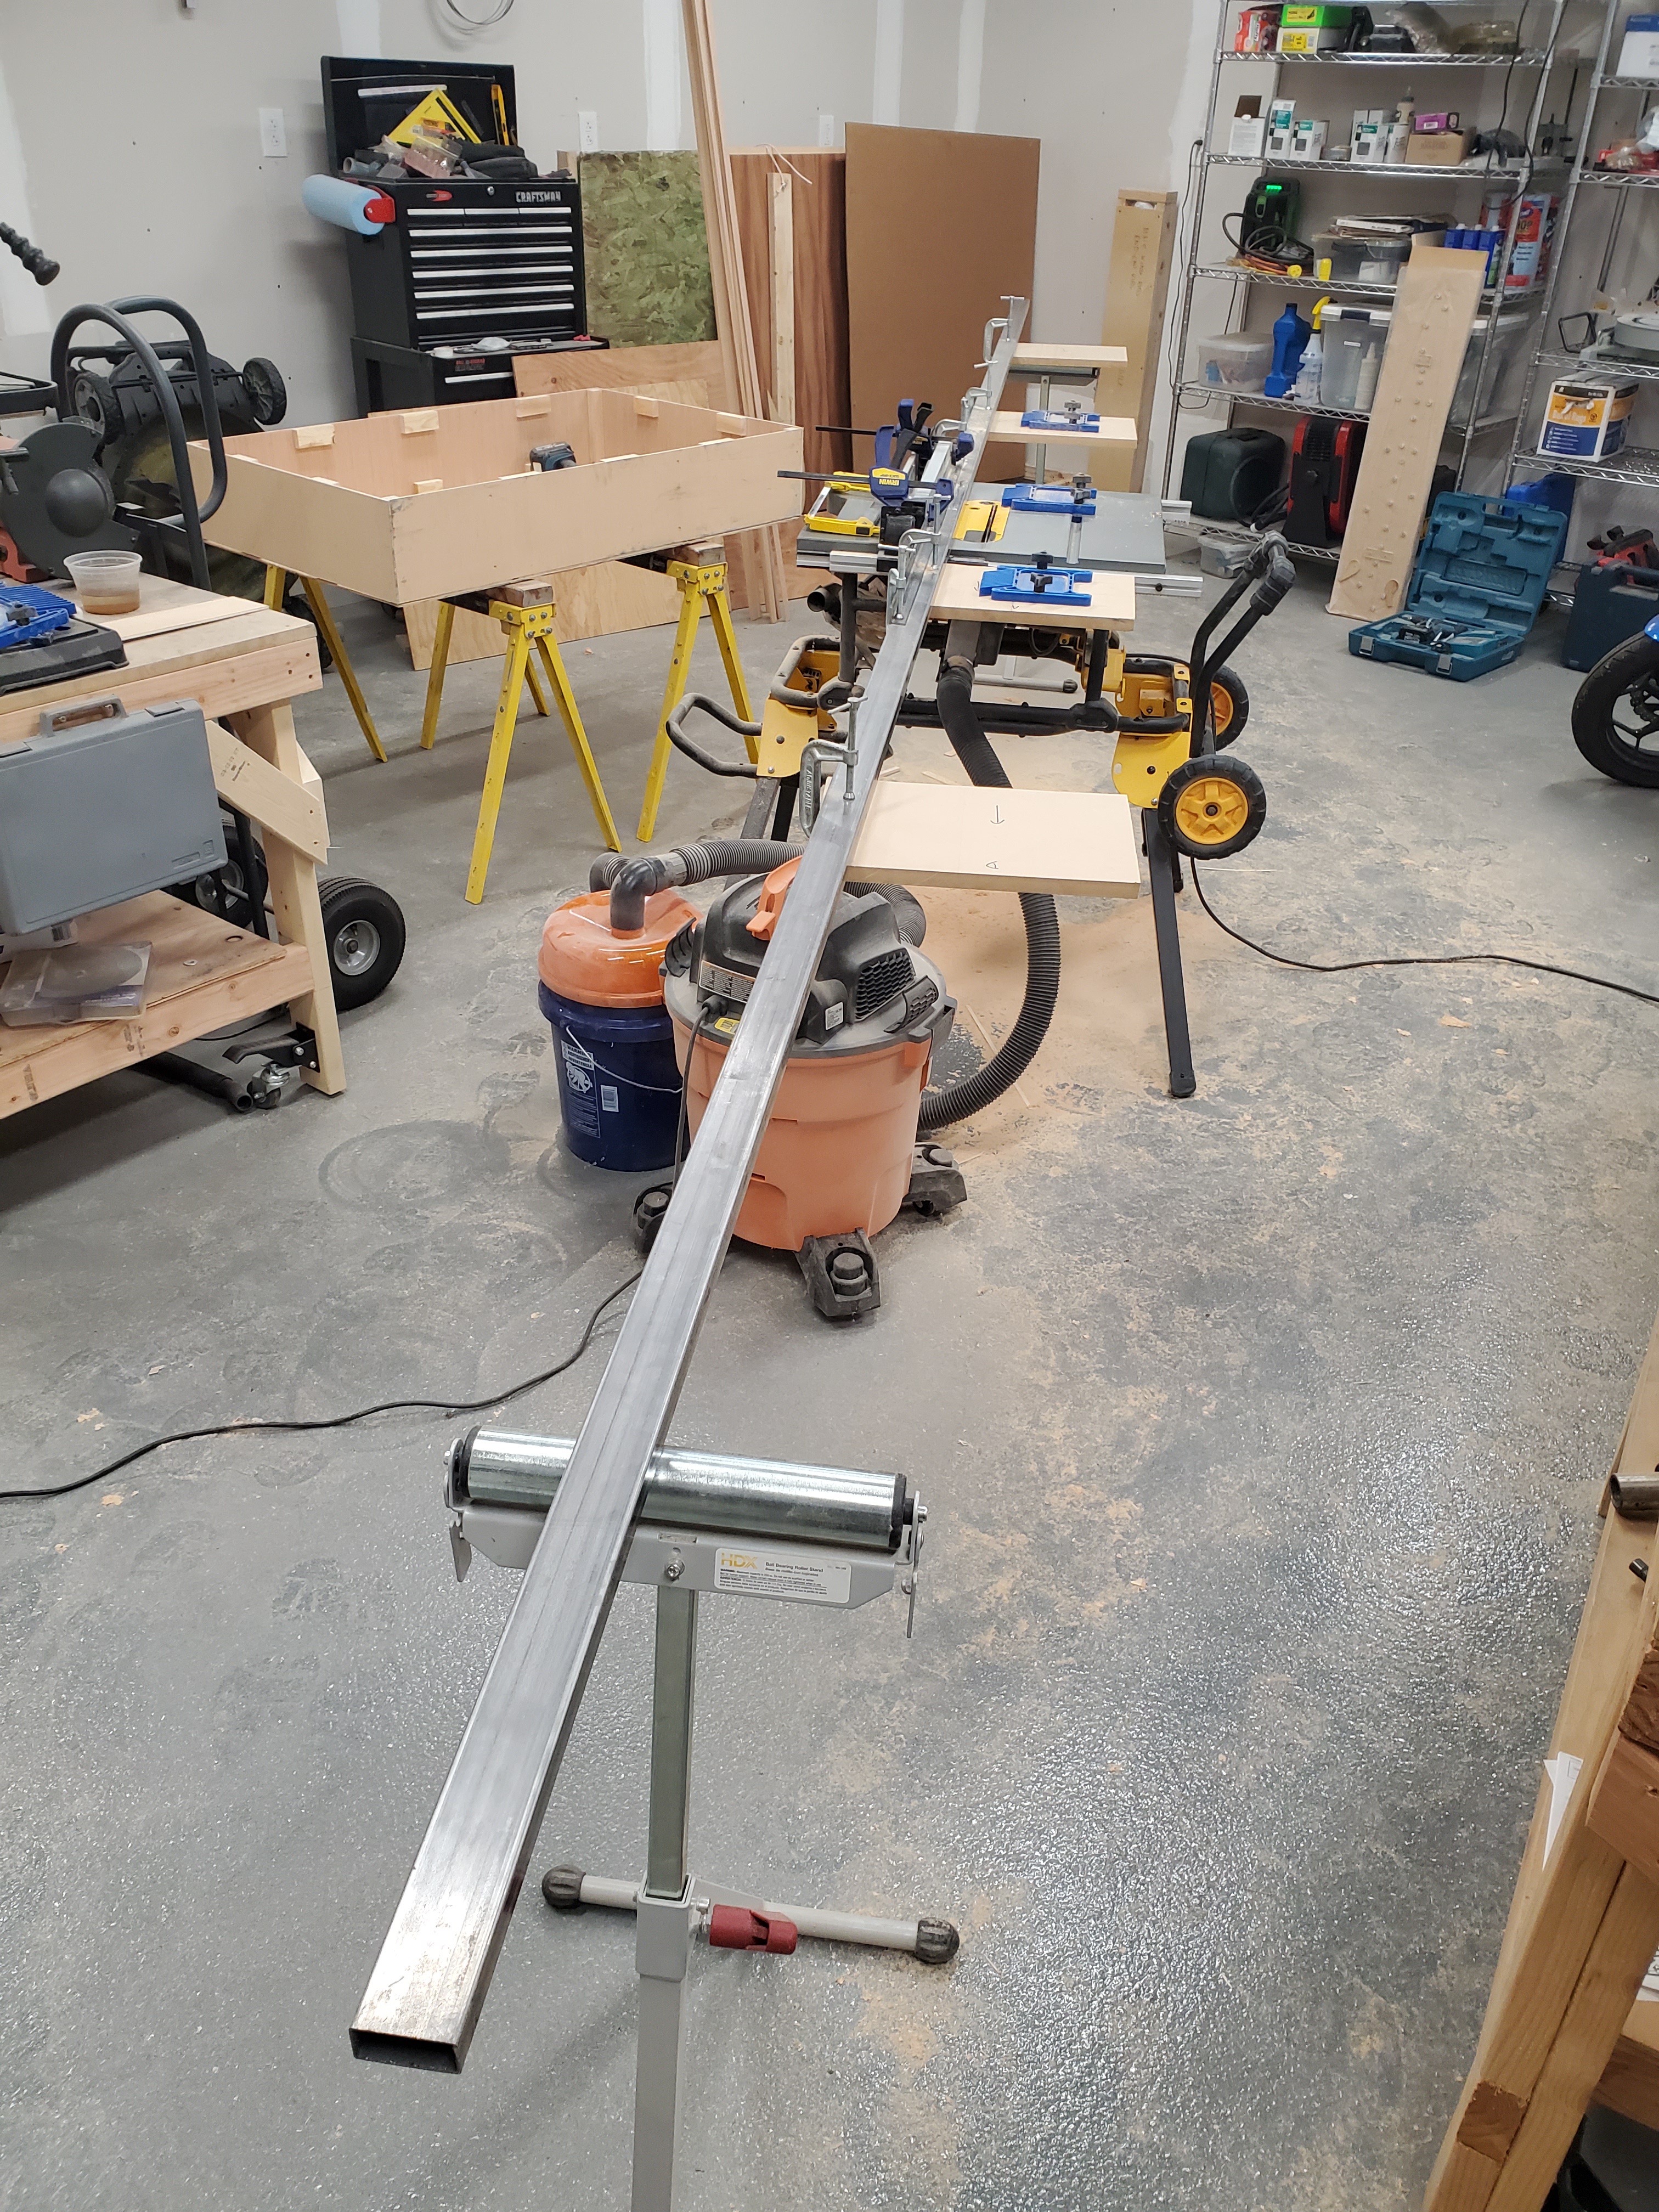
The Very Long Fence set up and ready to bevel some spars
First up, you have to take the spars, and cut the bevel angle in the top and bottom surfaces, so they'll match up to the ribs. To do this, I set up a Very Long Fence on my table saw, and used the saw to cut the angles. This was one of the scariest operations for me, just because it was something I'd never tried before, and aircraft grade spruce spar material is ridiculously hard to get hold of, so I was horrified I'd get it wrong. In the end, it wasn't bad, but I'm glad I did all the prep I did. Don't forget that you need left- and right-hand versions of the spars, and the bevels are different between the two.

Tapering the end of the forward spar
Next up, the wingtip tapers down to a point, so you have to taper the ends of the spars. This was less scary, because I ordered my spars a bit too long, so I had some wiggle room if I screwed up the first time. Having drawn the tapers onto the spar face with a pencil, I ran a handheld circular saw just outside those lines, and used a hand plane to bring the surface down to the lines as exactly as I could. It was a slow process, but the results were good.
Marking the Spars
Put centerlines everywhere. I drew centerlines down the top face and the inboard face, and wished I'd drawn centerlines on the outboard faces as well. I haven't found a need for a centerline on the bottom face yet, but I can imagine it happening.

All the ribs lined up along the spars
Mark the locations of all the thingies that will go onto the spar: mostly ribs, but also the compression tubes, and the aileron pivots. These measurements are each marked from a reference point (I used the butt end of the spar), and are marked on the top centerline. Then, draw the line at the appropriate 10° angle to match the sweep of the wing. This becomes the reference line for the hole which will eventually be drilled through the wing, and will extend onto wedge blocks.
I wrote dash numbers near each line, so I could double-check that I had my spacing and part order correct, referring back to Sheet 2 of the plans a lot. Once the wedge blocks are glued on, those ribs are never coming off again, so you want to be sure they're in the right position and the right order.
Those Wedge Blocks
In addition to making these weird 10° and 20° cuts to form the wedge block, you have to cut them down to the matching size and angle once you have the spar bevelled. I trimmed them on the miter saw, which was alright, but setting the vertical angle on my miter saw isn't the easiest, and I had to do a lot of double-checking to make sure I was doing it right. I ended up setting my hand plane on its side, and running the edge of the wedge block against it to make small trims.
Once you're sure you've got the ribs on in the right order and they don't need any last minute surgery (I worried about whether I actually wanted to have a stringer on the noses, to keep them stronger during storage, but decided I'd make a removeable stringer that was notched to fit the ribs), it's time to glue the wedge blocks on.

Test-fitting the forward cabane bracket
I tried fitting the brackets on with the wedges in place, and I'm glad I did: the forward cabane bracket really didn't want to slide inboard enough, without hitting the spar on the bottom forward corner. I ended up making it just barely fit by sanding the flat back of both wedges until the sharp edge had essentially no flat to it (the plans suggest 1/32" of flat). A better solution for this would be to make the brackets 1 9/16" wide instead of the specified 1 1/2", but that would have minor knock-on effects for the cabane structure and attachment hardware.

Many clamps. Many more will be needed later
Gluing the wedges in place takes a lot of clamps, and I used extra wedges to provide clamping surfaces, so the clamp didn't have to work on a slanted surface. As it was, I ended up stapling the ends of most of the wedges to keep them from squidging around on the lubricating coat of epoxy before it started to set up. Lots of wax paper strips kept the clamps from becoming a permanent part of the wing.
The little -238 wedges, which support the compression tubes where there's not also a steel bracket involved, proved to be more problematic that I'd hoped. At first, I was just stapling the thin edge, thinking that would be enough to keep it from wandering, but several of those wedges ended up twisted substantially off where they were supposed to be thanks to the epoxy-wander effect. I ended up re-drawing the centerlines on a number of wedges to ensure they'd be drilled in the right spot.
Drilling the Spar

Checking the alignment of the aileron pivots
The first holes to drill are those that sit at 90° to the spar: these can be done on the drill press, without ribs getting in the way. On the upper wing at least, it's really just the aileron pivot holes that can be done this way (the wing root fittings are the others, but those will wait until the two wings can be joined up, to ensure they're in the right place). In order to do this, I ran a straight piece of 1/4" steel rod through the three pivots, and made sure it could rotate freely before marking and drilling the mounting holes.
For the rest of them, how do you drill a straight, square hole in a 1.25" square wedge that sits at a 10° angle to the spar, with eleven loose ribs holding the other spar in their fragile grasp? Certainly not on the drill press, that's for sure. I ended up making two drilling jigs, the first of which was poorly considered. The one that worked was made from steel guide tubes clamped into quarter-inch thick aluminum rectangle extrusion, carefully milled to be square and straight. My attempts to weld the guide tube the first time were far too prone to warping, though others have had success with welding.

The drilling guide, Mk II. The pointed rods are for aligning
with a small hole in the material to be drilled
In addition to the drill guide tool, I turned points down on some 1/4" and 1/2" rods (the two sizes I would be using with the drill guide), and used them to physically index where the guide gets clamped: poke a hole where you want the hole centered in the spar, run the pointed guide into that hole, then use that physical connection to keep the guide aligned. The guide then gets clamped down so it won't move, and the actual drilling is kind of anti-climactic. I had to get a long 1/4" drill bit to fit through the guide tube, and still make any progress into the spar.

How the drill guide looks when it's in use
The 1/2" holes in the spar receive burly steel bushings, which take the 1/2" down to 5/16", and allow an AN5 bolt to pass nicely through. The bushing is there to deal with the tension of the flying and landing wires, which would otherwise bend bolts or pull through the wood of the spar.
And that brings me up to where I am right now. Two of four bushings made and installed into the wing, and four of five compression tubes temporarily fitted.

The current state of the wing
What's Next
Once I've finished fitting the bushings, I'll move on to fitting the drag wires. The plans call for drag strips, but I calculated that I could save a couple pounds of steel by using wires (the strips have to be oversize to deal with the weakening effect of welding, but the wires don't, so they can be smaller and lighter for the same strength).
Once the wires are installed, the compression tubes can be drilled and bolted for length, the wires tightened, and the wing "trammelled." Other builders have told me that keeping the spars straight and generally ensuring the 10° sweep angle is more important than trying to trammel individual drag wire sections -- due to the sweep angle, each of the drag wire sections is a different length, so the best you can do is set a trammel to calculated lengths based on trigonometric approximations, which is likely to be error-prone enough to offer only limited value. Better is to stretch a string (or possibly shine a laser) down the centerline of the spar, and ensure it stays straight that way.
After the wings are straight, the ribs are wedged and glued/nailed in place, and the next major parts tackled: the aileron can be built, all the plywood around the wing tank installed, the trailing edge installed, wingtip formed and installed, etc.
I'm using plywood leading edges rather than aluminum, and I've been advised that these shouldn't be installed until the wings can be installed and rigged on the fuselage, because it locks in the shape of the wing to such an extent.
It's exciting to finally be making something that looks like part of an airplane, rather than a weird little hunk of metal or wood. It's also exciting how fast it seems to be moving: from 2017 to the end of 2020, all I was doing was making weird little hunks of metal and wood, and although I was having a good time, it seemed like an endless task.
Now that I have all the weird little pieces made, the actual assembly of them into a complete wing is moving very quickly, and once I have this first wing built, subsequent wings will move even faster, since I have to work out the process on this one, but will have it pretty well down for the next wing. I just have to remember to mirror the plans in my brain, to make the next one a right wing instead of another left wing.
Posted at 23:49 permanent link category: /charger
Mon, 30 Nov 2020
Building a Biplane: On the Cusp of Wings
When I started this madcap airplane build in 2017, I decided I'd begin with wings. They're easier to store than a fuselage, and I was more comfortable with my woodworking skills. There are four of them, so once you've figured out one of them, the others should come a bit easier.
So, I started building ribs. I spent (checks dashboard) almost 250 hours building ribs. Then, practically speaking, I had to pack up the build and move, and that put a bit stop on any building. It's hard to build airplane parts when they're all packed away in a storage unit.
When I got to my new house, which has a blessedly large detached garage, I had some work ahead of me, getting the shop ready for its central role in the build: it needed to be spruced up, so I had someone in to put fancy paint on the floor, installed a whole lot of electrical outlets, put in insulation and drywall, and finally had the door replaced. Right around that time, the Covid lockdown happened, and suddenly I had a nice space to work in, and a whole lot of free time as all my social engagements dried up.
With ribs built and spars bought, I thought I was pretty close to building some wings, back in 2018. For better or worse, I was skipping over a few things in my head: I had to build wedge blocks, and I had to prepare all the brackety bits that go into the wing. I'd already gotten the brackets in a kit, but I had kind of handily forgotten they all had to be welded together and painted. Surely that can't take too long, right?
So, here it is, nearly December of 2020, and when I started the project back up again in April of this year, I was at 375 hours on the build. Today, the tally stands at 791. I am, as of tonight, finally done with all the things I think I need to do before I can start assembling a wing. I was a little bit wrong about being ready in 2018, let's say.
Granted, I could have shortcut the process to get to wing assembly earlier: I've built every single part I should need for all four wings. It made more sense to tackle each job completely and get it all done, and not have to come back and tool up for the next wing's parts.
And I think, fingers crossed, that I should be able to build a wing pretty fast now. All the parts are built, right? (Of course not, but all the parts are built that could be built before the wing is assembled. There are a few that need to wait until there's a wing sitting there to get some dimension just right.) I'm sure I'll still figure out how to take many months to build the first wing, but hopefully the second through fourth wings will go a bit faster. Hopefully the first wing doesn't take years, but I suppose it might. Somehow the ribs, which I thought should take 6 months, ended up taking almost a year and a half to finish.
The process of building up the wing is a subject of some mystery to me. Mark Gilmore wrote up a handy list at the end of this article, which I'm using as my broad instruction sheet for wing assembly. However, it makes a lot of assumptions, and glides blithely over a whole lot of details. I get the broad strokes, but I have a feeling I'll get tripped up in the details over and over.
At least for tomorrow (or the next time I can get out to the shop, anyway), the plan is clear enough: unpack some ribs, slide them on to the wing spars, and see how things look. Try clamping some wedge blocks and brackets onto the spars, to see how it all actually fits together. A whole lot of things will probably become clear at that point.
From there, it's just a matter of narrowing down the tasks to things that are small enough to comprehend, and start going down the list. And oh what a list it will be, I'm sure.
Posted at 23:07 permanent link category: /charger
Thu, 08 Oct 2020
Building a Biplane: Channel Bending Videos
I made a couple of videos recently about bending up the -353 aileron control horns, after I blew through my two pre-formed brackets. I explain below.
Then, I made a follow-up, where I actually got it right.
Enjoy!
Posted at 14:02 permanent link category: /charger
Sat, 19 Sep 2020
Building a Biplane: Paint Jobs
Although I'm still a decade away from having anything to paint, I occasionally think about what I'd like this eventual biplane to look like. To that end, I've been slowly collecting coffee-table books on golden age aircraft, and the COVID lockdown has given me enough time to go through all of them, learning about historical planes, but also keeping an eye out for paint schemes I liked.
When people ask me what I'm building, I have a photo downloaded on my phone, which I show. It's from the article, Glenn's Charger Flies Again, and I like how it shows the sweep of the wings:

As I have looked at this plane over and over when showing it to people, the red color has grown on me. I wasn't averse to it before, but between repeatedly looking at this photo and a flying experience I had a few years ago, I'm pretty sold on red.
What happened a few years ago was that I was in Norbert, my little Champ, flying out to Hoquiam on the Washington coast, for a FATPNW event. The weather was on the low side, with a solid overcast at maybe 4000 feet, so it was perfectly safe to fly, but there wasn't a lot of "up" available. The clouds lowered as we got close to Hoquiam, and were at more like 2500 -- still safe, but again, not much "up" available. I landed late for the event, and most people were ready to leave, so I only ended up being there for a few minutes. This was fine, as I was really in it for the flying, and have always had a hard time socializing with people I don't know.
One of the planes there was a Cessna 152 which had been painted bright red. I thought it was kind of garish when I saw i on the ground, but that changed completely when we flew out as a little group.
It was me (black and green), this 152 (bright red), and a couple other planes painted in the sort of generic white-plus-colored-stripes themes that are so common in the general aviation fleet. We had all departed in the same wave, and flew in something like a very very loose formation as we departed the Hoquiam area, over low rolling hills.
Being in a very loose sort of formation, I was pretty keen on keeping visual track of all my fellow aviators, to make sure we didn't get too close to each other. We were still half a mile apart in all cases, but that's pretty close, in airplane terms.
As I was tracking these various planes, every time I looked for the 152, I could find it immediately. It popped against the dark green scenery, with its bright red paint. The white planes were harder to spot. It got me to thinking: white is the same color as clouds and a lot of things on the ground. Almost nothing on the ground is bright red (certainly there are cars, but visually they're almost invisible because they're so far away). That bright red paint job made that 152 so much more visible than anything else.
With that thought in my head, plus repeatedly seeing the picture of Glenn's Charger, I've found myself inclining to a red paint scheme for my Charger.
I'm also a fan of black, though I think it's not a very good airplane color, just because it can disappear into the background with such ease. What about a majority-red paint job, with black accents? Sounds pretty good. I had put together a functional but not pretty model of the Charger in X-Plane, so I spent a few hours figuring out how to wrap my ugly grey model in a slightly prettier color, and came up with this, which is useful mostly as concept art:

This was pretty good, though obviously very basic. Not sure about the N-numbers, they'll probably end up being the 2" numbers that I'm allowed to use rather than these 12" numbers. But the basic idea is there.
Then, when I was flipping through my various coffee-table books, I came across this Waco CTO on page 36 of Wings of Yesteryear: The Golden Age of Private Aircraft by Geza Szuravy, and I thought, yes, this is the look:

The exact shade of red may or may not be correct, but I love the tapered black stripe with the little harpoon-head at the front, and the gold pinstriping.
I certainly can't promise my final paint will look anything like this, but at this stage in the process, I like it a lot.
Posted at 12:21 permanent link category: /charger
Sat, 12 Sep 2020
Building a Biplane: Cutting Spars
The most expensive single part in the wing of a Marquart Charger is a wing spar. This is the long piece of wood which runs from the root of the wing out to the tip, and is the backbone of the wing, if any creature had two backbones at once. There are two spars, see, so the analogy only sort of fits.
In any case, the spar is a piece of aircraft-grade Sitka spruce (and as soon as you describe anything as "aircraft-grade" you can just see the dollar-signs rolling up in vendors' eyes), either 11 or 12 feet long depending on whether you're talking lower or upper wings. It's an inch thick by about four and a half inches tall for the front spar, or about two and a half inches tall for the rear spar.
One of these glorified two-by-fours costs between $110 and $150 apiece, depending on length and size. Because of their length, shipping a single spar and shipping all eight spars costs about the same: around $200 when I ordered mine, more now. However, even more than their monetary cost is the cost in time. When I ordered my spars a few years ago, it took Wicks Aircraft 6 months to finally realize they couldn't get good enough spruce any more, and cancel my order as they got out of the spruce business. It took Aircraft Spruce, the only company left in the country (as far as I'm aware) who was capable of filling the order, another 6 months or so to finally ship my spars out to me. (No negative reflection on either company, this is a really tough market to deal with.)
The problem is that aircraft-grade lumber is rare. The loggers have to carefully lower an old-growth Sitka spruce tree to the ground, either with a crane or a helicopter, to avoid compression fractures as it falls. It has to be treated carefully, and it needs to be nearly perfect: no knots, no sap pockets, perfectly straight grain of an adequate density, etc. All of which is to say that you can't just call up the lumber yard and order a replacement spar if you mess one up. Wicks said they got a new shipment in every week and in 6 months didn't find enough wood of a high enough quality to fulfill my order. Talk about overhead.
As a result, I've been half-terrified of actually cutting my spars ever since I got them. If I mess one up, not only am I out $300+, I'm down for around 6 months while I wait for a replacement. "Fortunately," I've been learning all about the expense of aircraft parts, so $300 barely causes an eyebrow-twitch any more as I ponder $1,500 radios, $3,000 ADS-B transponders, and $27,000 engines. (I knew it was going to be this expensive before I ever started, but it still amazes me sometimes how much this stuff costs.)
So, how am I going to approach the actual cutting of my spars? Very very carefully, that's how.
I need to do a number of operations to the spars, but the first and most frightening to me is cutting the top and bottom angles. Because wing spars are part of an excitingly curvy airfoil-shaped wing, and to simplify the construction of the ribs, they're cut at an angle on the top and bottom surfaces, rather than being square.

The front spar's profile

The spar fits into the rib in the red section, which shows why
it needs to be angled
The main reason it's the most frightening is that it involves the use of the table saw, which is nothing more than a raw saw blade poking up out the top of a table, without all the sensible guards and precautions of a nice bandsaw. It's so easy to accidentally shift a little bit and carve a big divot out of whatever you're cutting. Not a huge deal when you're cutting a piece of crappy plywood for a theatrical set that's going to be up for 6 weeks, but fairly daunting when it's aircraft-grade spruce on the line.
The way to prevent this from being a problem is to lock that fancy 2x4 down as much as possible. Make it so there's literally no dependence on the steadiness of my hand as I guide a twelve-foot piece of lumber through the saw. This is the idea I got from another Charger builder, who sent me some photos of the following idea:
- Acquire a long piece of steel, at least ten feet long, preferably longer, to act as a fence
- Set up the fence on the table saw at the appropriate distance for the cut to be made
- Add multiple "platforms" along the bottom of the fence, to support the lumber being cut
- Add feather boards to the platforms to hold the lumber in its exactly correct position
- Add feather boards above the blade to keep the lumber pressed down to the table
- Practice on a small piece of spar material (or other 1" thick wood) until the cuts perfectly fit in rib openings
- Cross fingers, kiss blarney stone, rub lucky rabbit's foot, etc.
- Cut the real thing
Tonight, I gathered together all the pieces needed for steps 1 through 5, or at least those I already had on hand. A few months ago, I acquired a twenty-foot-long section of rectangular steel tubing, which was pretty ridiculous to bring home on my little truck, but it works great now that it's here. The platforms were made out of the very useful piece of MDF I've been slowly nibbling on over the last few months. My clamp-related oniomania has paid off, and I had plenty of clamps on hand to get everything set up. I only have three feather boards and I'd like to have five, so I'll have to find two more, and the Kreg feather boards are pretty awesome, so I'll be getting more of those. Finally, the rolling stands I got a while ago made excellent end-supports to keep the fence from rotating due to the unbalanced weight of the little MDF platforms.
This is the final result of the first attempt to set most of it up:

The Very Long Fence set up on my little construction table
saw

Close-up of the business portion; no cut distance set, this was
just the first shot at the idea of the thing
It probably won't work in this position, as the steel is only 20 feet long, so there needs to be about two and a half feet of space off either end of the fence for this to work with a 12 foot spar. Fortunately, this isn't the final setup, just the first attempt, and it'll be shifted around and reorganized so it will work -- moving the saw so it's sitting diagonal to the space will provide plenty of room. Another time I'm glad the whole shop is on wheels.
I picked up a couple of 2x6s to trim down into faux spars, so I'll get a couple good shots at doing "the real thing" without actually doing the real thing. Fortunately, I have the shiny new bandsaw to resaw the 2x6s with, so I can get closer than my previous attempts using the table saw for resawing, which never turned out quite right.
I suspect that this is going to result in a video as well, but no promises. I find that I'm usually interested in taping the big scary stuff (or at least the stuff I find big and scary), just so I can get through it, have proof I did it, and can show everyone else that it's not as big and scary as I thought it would be, which is invariably the case.
Posted at 23:23 permanent link category: /charger
Thu, 03 Sep 2020
Building a Biplane: Painting: The Next Frontier
For the last few months since our collective COVID lockdown started, I've been working away at the brackets and wedges and other pieces that make up the wings of a some-day Charger biplane. I called Seattle Powdercoat in March asking them about their sandblasting services, and told them it would be "a few weeks" before I'd have things ready to bring in. Oh, it is to laugh.

Completed brackets
Here we are in early September, and I finally have all the brackets done that need to be done (almost: the wing root brackets that will attach the lower wings to the fuselage are waiting for later due to the specific fitment issues they will have, which depend on having both wings and fuselage ready for everything to be hooked together). I am, at long last, looking down the barrel of my longstanding nemesis:
Painting.
I've never much liked painting. It's messy and you have to wear disposable clothing and it's so easy to get wrong, and so chemical, and it just never clicked with my brain the way other parts of building things did. Yet, if I were to hire out the painting for this whole biplane project, it would add tens of thousands of dollars in labor. And lots of other people are able to paint their own planes, so why shouldn't I?
The basic idea I've got is as follows: use Stewart Systems paint (which is all waterborne, and substantially less toxic than other systems), and when it comes time to paint the big pieces, put together a paint booth inside the shop by using plastic sheeting to enclose a volume that will fit all the pieces necessary. I'll start with their EkoPrime and EkoCrylic paints for these little brackets. This all presupposes a bunch of stuff, though.
Equipment. To get set up for a job like this, I need to invest in equipment. Specifically, a nice spraygun, which is a several-hundred-dollar item. That's ok, it's not too bad, but on the back end, it demands a capable air compressor. My current compressor is a $100-special pancake compressor I got down at the big box store 10+ years ago, and is emphatically not up to the job. Stewart recommends a compressor capable of 13 cubic feet per minute (CFM) at 90 PSI, and my little compressor is probably capable of around 2 CFM. Maybe 2.5. The cheapest option that will be close to the mark is a 60 gallon, 3.7 HP compressor for $560, at 11.5 CFM (though I have it from another builder that this compressor is definitely up to the job, which is reassuring). To actually make the mark and meet or exceed 13 CFM, the cheapest option I've located is about $1200.
More important than the money, though, is the installation and space. If I were to do it strictly right, it should be bolted to the floor, and plumbed into a system of copper or iron pipes that are installed into the building, doubtless a week or more of work for me. The compressor itself is supposed to be placed 18" from the wall, meaning it would take up about three feet of space in the tightest corner I could pack it into, which is a huge amount as I ponder where I'm going to put four wings and a 20 foot long fuselage and still have any working space left over.
Fortunately, another builder opined that he set up his giant compressor on a wheeled platform, and that makes the whole thing much more palatable. It's not as ultimately safe as being bolted to the floor, but at least on wheels I have the ability to place it where it's going to be least in the way. Everything else in the shop is also on wheels for specifically this reason, so it's a pretty compelling idea.
On top of the compressor itself, there's a noticeable investment in filters and water separators and hoses and connectors to make it all work. My current compressor setup is extremely basic, though it's enough to power a small spraygun with the addition of an appropriate filter to get rid of condensed water.
Leaving aside the question of the compressor (for I will most likely live with my tiny compressor for now, since the volume of painting I need to do at this point is very small, and doesn't require the massive air capacity of the big boy), I have essentially zero experience spraypainting anything. To be sure I've shot my fair share of rattlecan paint, but I never cared if there were runs or surface imperfections. Only on one project, perhaps 15 years ago, have I attempted to make a real professional appearance using rattlecan paint. It turned out alright, but I barely remember what I did, so it's not much help in guiding my hand now.
Because my quantity of painting is so small, I'm not excited about building a proper paint booth in the shop. Thus, I decided I'd try building a micro paint booth, which is mostly a stand to hang parts from, with some plastic inexpertly draped about it.

We'll see how it works. On Biplane Forum advice, I'm going to remove the back plastic so it doesn't all just blow back in my face, and do the whole thing outdoors so I don't accidentally paint everything in the shop with a light dusting of primer.
So, I have a compressor, a tiny spraygun, with a smaller one on the way (one of those little pencil-shaped guns that modellers use, recommended for its frugal paint use and lack of overspray), hose, connectors and a painting rack. I have a good filter on the way. It's not the right setup for doing Real Painting™, but I think it'll work for what I'm doing.
The final step is to do some test spraying with my setup, and make sure I have some idea what I'm doing, and that everything I've got is goign to work like I want it to. Most of these brackets will be hidden away inside the wing, so they don't need to be beautiful, but they do need to be adequately protected from rust, so I want to have some confidence that my technique won't simply have the paint flaking off immediately.
Then, at long last, I will be able to take all these parts into the sandblaster and have them cleaned up for painting. You know, "a few weeks" later.
Posted at 15:51 permanent link category: /charger
Sun, 19 Jul 2020
Building a Biplane: Getting Unstuck
For the last four days, I've been trying to figure out how to make this part:
![[Image showing
plans to make the tie-down ring, part number -282, for a Marquart
Charger]](/reaper/journal/images/2020/tiedown.png)
The -282 tie-down ring
It looks simple enough on the plans, all innocent and perfectly drawn. Yet it's taken me four days so far, 17.5 hours of work, with more to come. Most of these brackets I've been making take maybe 4-8 hours to sort out. But this one's special.
The journey starts with: How to bend that hoop? Quarter-inch 4130 steel is no slouch in the strength department, though with a long enough lever it's easily bent. My first try was just to clamp the thing in a vise, perpendicular to a length of stout 1" tubing I had lying around (for the 1/2" radius bend), then bend it over the tubing by grabbing the long end and giving it a shove. This worked, but the resulting bends had a disagreeable curve to the "straight" parts that I didn't love. My math was also poorly understood, so it took a few tries before I got the right size, and I only had 17" of the stuff to work with. Finally I gave up and decided I could live with the poorly-bent hoops, just so I could make progress.
So, hoops done, check. I had the plates already, thanks to my various Ken Brock bracket kit purchases. I held the hoop up to the plate and tried to imagine how I'd actually hold any of this together. It's pretty fiddly, and clearly a quality jig was in order.
The first problem with the jig is that the space between the plates needs to be 2 1/8". I had 2" square tubing, which I'd used to make jigs for other brackets, but I had to find that extra 1/8" of thickness somewhere. I have some 1/16" thick sheet lying around from a previous project (making the drag strips, which I ultimately scrapped in favor of wires), so I decided to weld two layers of that onto my jig, which should work out to exactly 2 1/8" thick.
Of course, it did not. It was a little bit thin for some reason, and since these brackets tend to shrink a little after they're welded, I really didn't want to start off too small, or I'd never get the bracket onto the wing when the time came. So I did the only reasonable thing I could think of, and ran a weld bead down each of the 1/16" strips to make them a bit thicker.
![[Image showing the welding jig with weld beads built up]](/reaper/aviation/biplane/buildlog/images/20200716_130344-md.jpg)
The welded-up jig
Then it was a whole lot of filing to get them back down to the right size, after I managed to crash the head of my milling machine when the jig leapt up into the cutter and stopped the works very quickly indeed -- I still need to open that thing up and replace the busted gears. But I got it to the right size, and I'm going to have very odd musculature in my arms when this is all over.
However, my skill with a file is not expert-level, so the strips are only about right, they're not perfectly flat. I decided this was an acceptable compromise because it's all getting welded anyway, and striving for perfection there is an exercise in frustration thanks to the expansion and contraction of the steel as it's heated and cooled.
In any case, I took my imperfect jig to the drill press, and carefully drilled out the hole that would locate the side plates. Not carefully enough, though: the entry hole was perfect, but the exit hole was at least 1/16" off, probably because I'd been resting the jig on those imperfectly welded and filed strips. So I tried a trick I've never done before, and welded up the hole, having to weld from both sides. It worked, to my amazement.
None of this addresses the original problem, though: how to deal with that floppy hoop that has practically no mechanical connection to the plates until it's welded. Finally, I decided that I'd make a crossbar with slots in it that would hold the hoop, and the milling machine came out again (I'm telling this out of order; I made the crossbar before the head crashed). That piece at least was pretty easy to make.
The final problem to solve (so I naively thought) was how to make sure the side plates, which are held down by a single bolt, couldn't rotate. When installed on the plane, they interlock with a big round piece, but I didn't want to have to make that up for my jig. Instead, I ended up making a little shelf out of metal for the legs of the plate to rest on.
![[Image showing the finished welding jig]](/reaper/aviation/biplane/buildlog/images/20200716_214634-md.jpg)
The finished jig, in the ready-to-weld setup
Finally, late in the evening, having fussed with the spacing on the imperfect hoop for several hours off and on, I turned on the torch, and applied heat to metal, tacking the hoop in place. As soon as I did, I realized that my design was lacking, and there was no way to get the tacked bracket off the jig. The crossbar was locking it in place, and I ended up (the next morning) having to saw the ends off the crossbar, and file rounded ends in it so it could get past the plates while still holding on to the arms of the hoop.
This was ok, because a discussion on the Biplane Forum had convinced me that I needed to try making stainless steel hoops. The idea was that there was no way to chip the paint off them, and they wouldn't rust. There followed a feverish study of stainless steel properties and welding techniques, and a quick order to the metal shop. I was glad to be able to get it on Friday afternoon, so I could have the project to work on over the weekend.
I had called my dad to discuss the stainless steel (he knows more about stainless than I do), and he reminded me that I had a better way to bend the rods than just clamping them next to a tube and pushing hard: I have a press. And, I realized, I built a really moosey tailspring rebending tool which might just work as an improvised press brake. The idea is that you use the press to push on the center of the thing you want to bend, while it's resting between two bars, or a V-block, or something like that. The idea struck me, so I spent most of Friday trying it out. Fortunately, I got three feet of the stainless steel rod, because I made bad bend after bad bend (not the press brake's fault, I just kept getting the math wrong). Eventually, though, I ended up with two perfect hoops, exactly the right size, and with lovely square corners. Shown here before the ends were trimmed, so their perfection isn't quite as obvious:
![[Image showing two nicely bent-up tie-down hoops]](/reaper/aviation/biplane/buildlog/images/20200718_172601-md.jpg)
Hoops!
I decided, wisely, that before I would commit my hard-to-reproduce side plates to this project, I would try welding some of my incorrectly bent stainless rod to some mild steel, just to see if I could do this dissimilar-metals welding well enough to put on an airplane.
I welded the first hunk of rod to a failed experiment that was a sort of box of square tubing, which was certainly a decent stand-in for the side plate. Once it cooled down I hit it with a hammer a few different ways, finally sticking a piece of MDF (not the strongest material, but the right size, so why not?) through the center of the box and tried pressing the rod away from its plate. With one moderate hit of the hammer, it ripped right off.
Well, that's not good.
I tried again, on a different spot. Same thing. I made a smaller test piece, thinking maybe the big box was sucking up too much heat. Nope, same thing. For some reason, the welding rod I was using to build up the weld was porous and quite weak.
Just to make sure it wasn't my technique for welding a rod to a plate that was at fault, I tried the same thing with a piece of the 4130 that didn't get bent well. Making the same test, the MDF was destroyed, and it barely moved the rod. But it did move it enough that I could flip the piece and whale on it with the big hammer. It bent, then bent further, then bent almost double. The weld held, finally just starting to tear as the rod took its last few hits. That was much more like it. That's a weld I'd trust to hold down an airplane, or jack up an airplane.
![[Image showing an amusingly bent piece of 4130 rod welded to a
mild steel structure]](/reaper/aviation/biplane/buildlog/images/20200718_213054-md.jpg)
At least the weld didn't break
So, the stainless steel experiment was a bit of a bust, but at least I found out before making a bit expensive mistake, or even worse, putting it on the plane and thinking it was doing well until the one thing that would doubtless be a catastrophic failure.
Now I just have to find more 4130 rod. But once I have it, I have the perfect bending technique all lined up and ready to use. Five days to produce two tie-down rings? Why not.
Posted at 00:43 permanent link category: /charger
Sat, 04 Jul 2020
Building a Biplane - A Quickie
In my video on making aileron pivots, I said I'd spent 16-some hours so far, and expected to spend 20 more before the pivots were all done. I've finished them (or at least gotten to the condition I was thinking of when I made the 20 hour estimate, which means they're ready to be sandblasted, painted, and finish-reamed, so still several hours from being done) as of last night.
I've spent some time revamping the build log (coming soon), and while I was dinking around in the database this morning, I decided to see how many hours I'd actually spent building aileron pivots.
sqlite> select sum(hours) from events where date >= "2020-06-05
19:27:02";

57.7
My original estimate? Less than 40 hours. Actually? Almost 60, over the course of almost exactly a month. It's silly, but I find this very amusing.
Posted at 10:15 permanent link category: /charger
Sat, 20 Jun 2020
Building a Biplane: Some Updates
I've been making good progress on the Charger build lately, and wanted to share some news.
The first thing is that I've made a dashboard showing my build progress. It was amusing to put together, and it's interesting to see in charts and graphs how I've been working on the plane. Having to take 2019 off due to lack of shop space made a pretty healthy dent in my progress.
The other thing is that I made a video about a tiny part of the build process, which may or may not interest you.
This shows one of the many many little steps that go into making the aileron pivots, which are deceptively simple-looking on the plans. It's just these three arms, how bad could it be? As I mention in the video, it's going to take something like 40 hours to go from looking at the plans to having 12 functional pivots in my hand, and that's not even counting getting them sandblasted and painting them, which is a completely separate adventure.
As someone commented about the build when I was describing it to them, "Oh man, even the details have details." Yep, the top-level step of "make 12 aileron pivots" touches on all sorts of questions: how to buy steel that hasn't been made for decades; what's the best compromise among the available sizes of steel; where to find that size; justifying paying $18 a foot (not including shipping or tax) for a weirdo size of steel that is also going to make the plane unnecessarily heavy; where is the steel after the seller put the wrong zip code on the box; how to cut steel; how to cut steel so it's square; how to cut steel so it's got the correct angle to the cut; how to figure out the correct angle to the cut (CAD to the rescue); how to locate two holes in a part so that they have the exact same placement on every piece; how to assemble the pieces once they're cut; how to build a welding jig for assembling the pieces once they're cut; how to make a welding jig that will lock everything into place, and then let it go once it's welded together; how to weld these two pins so they actually match the piece they're supposed to locate... It never ends.
To be clear, this is a big part of the fun: taking a job and breaking it down into its component parts, and then doing all those little jobs as efficiently and well as possible. In the end, you have a finished product that reflects all the hours and effort. It's slow going, but it is rewarding, eventually.
Posted at 23:44 permanent link category: /charger
Tue, 26 May 2020
Building a Biplane: Welding Brackets
I have reached a significant milestone, but it's not exactly about building an airplane. No, what I've done is finally finished the shop.
Of course, the shop will never be finished-finished, but it's now good enough that I can stop thinking about it, and get on with building an airplane. The door is replaced, the drywall is done, the electrical is inspected and passed. Finally.
Which leads me to the next phase of building a biplane: welding brackets. A typical bracket assembly looks like this:

Lower rear interplane strut bracket
The bracket starts life as three separate pieces: two -202 plates, and one -220 filler piece. The challenge is to assemble it and weld it so that all the holes are still lined up and the bracket is straight. Welding tends to make pieces move all over the place, because the welded metal heats up and expands, then contracts when it cools down, just a bit smaller than before it was welded.
This means that the pieces to be welded need to be held in a solid fixture or jig, that keeps them from wandering too far. They'll never be perfect, but perfection is always the goal.
So, my job is to come up with some way to keep these plates in line with each other while heating them to white hot. My first thought, which I'm glad I was talked out of, was to make some MDF pieces (a type of engineered wood that's basically sawdust and glue pressed together), which would basically take the place of the spar and wedge blocks shown above.
MDF is probably rigid enough, but the heat would have set it to smoking badly, and might have caused the structure to weaken enough that the welded pieces wouldn't have been held tight. So that was out.
I was resistant to making them out of metal because I didn't have any metal to speak of. As we live through a global pandemic, I'm trying my best not to venture out, but I decided this was probably worth it. I ordered some square tube stock from Online Metals and picked it up the next day.
So, the jig for this piece needs to do a number of things. It needs to:
- Keep the bolt-holes aligned
- Keep the plates aligned
- Keep the spacer piece straight
- Not be terribly expensive
- Not be terribly hard to make
I surveyed the jigs that needed to be made, and identified two main spacings I would need: 1.5 inches, and 2 inches. Thus I ordered lengths of those two sizes of square tube, so I wouldn't have to try to build up the right thickness. It turns out I missed the 1.25" brackets that go at the root end of the wings, but I'll work on those later.
The jigs would also need a flat piece across one end, for the spacer to rest against. Somewhere in this process I found the small collection of welding steel I had packed up so carefully when I moved, and decided I'd use the 4130 sheet left over from making the drag strips for this, since it just needed to provide a reference surface, not bear any weight.
What I came up with was this:

Partially completed -202 bracket jig
That's only partially completed, it would eventually have a second hole drilled, so that it would hold the brackets like so:

-202 jig holding all the pieces of the bracket
This plan worked out pretty well, but it took me a couple different jigs before I figured out the best technique for making them, specifically for drilling the holes so they were straight, and would align with the bracket plates. I'm making heavy use of the mill now, simply because it allows me to be so precise. It's almost certainly overkill, since these pieces are getting welded and will necessarily distort themselves all over the place, but you might as well start from a place of precision if possible.
The end result has turned out well, and the brackets look pretty good:

Finished brackets
The biggest problem I actually ran into is that the first set of wing brackets I bought a few years ago turns out to be coated in cadmium as a rust preventative. It worked really well, those pieces are all rust-free. Unfortunately, welding cadmium-coated metal is a good way to severely damage your health, and getting rid of the cad plating involves either muriatic acid, which is quite dangerous, or burning it off, which pollutes and is quite dangerous.
I figured out they were plated when I welded up my first piece, and noticed the horrible black smoke coming off the metal, and the yellow fume that seemed to stain near where I had welded. I clued in enough to put on a respirator after making the tack-welds, but that was not an ideal situation to be in.
Fortunately, one of the Biplane Forum members recently sold me a second set of brackets, duplicating and expanding the first set. This new set turns out to be not plated with cadmium. So, they're a trifle rusty, but clean up nicely, and don't rapidly poison me as I weld them. Win-win, honestly.
I'm on my way to getting my brackets done, another small step accomplished in the impossibly large project of building a biplane from scratch.

Slowly chewing that elephant, one bite at a time
Posted at 00:02 permanent link category: /charger
Tue, 21 Apr 2020
Building a Biplane: Improbably, a Sort of Milestone
When I describe the process of building a biplane, I invariably describe it as one that's going to take "ten to twenty years," because that's just how life is. Most credible estimates suggest that doing something like building a Marquart Charger from scratch is a 3000-5000 hour job. I'm probably going to end up on the 5000 hour end of things (particularly if I try for a round engine, but that's a discussion for a different time).
However, taking the middle of that estimate, at 4000 hours, may be a reasonable best-guess.
I mentioned a couple entries ago (and more than a year ago) that I was maintaining a log of all the work I've been doing. I promised to make it more than it started as, and I've taken the first step along that path: I added a "total hours" row at the bottom of the table. It was a lark, but it reveals a sobering truth: despite my jests about being at the very start of the process (which it truly feels like I am), I'm actually making significant progress.
As I write this, the total hours number stands at 388.8 hours. That is to say, nearly 400 hours, which would be about 10% of the build.
I'm 9.72% of the way done with building a Marquart Charger.
It's not a huge number, sure, but it belies the sense I've had for a long time that I was just farting around, making no real progress. No, in fact, I have a complete set of wing ribs finished, an appreciable portion (I'd say around 90%) of the wing parts built, on hand, or poised on the edge of ordering (the cross-brace wires are waiting on me properly inventorying my need for more spruce bits so I can combine the surprisingly expensive shipping), and am in the final stages of shaping the last little bits and pieces that need to be fabricated.
Once I have the cross-brace wires and fork-ends ordered, all that's left is painting a bunch of steel brackets and profiling the spars before I can start assembling the wings in earnest, at which point I suspect things will seem to move very quickly, compared to the visually unimpressive stack of wing ribs.
There's always more work to do (at least 90% to go), but it's nice to take a step back and appreciate that I really have made some good progress.
Posted at 14:21 permanent link category: /charger
Wed, 15 Apr 2020
Building a Biplane: Back In the Build
My last entry was pretty brief, with the simple aim of showing you my build log. Looking at the log, and at this journal, you would be correct in guessing that there was some kind of an interruption.
In late 2018, it was becoming obvious that I'd have to move soon, which would mean giving up the shop I'd put together for my Charger build. It would mean an unknown delay until I could find another house, ideally with a shop, and resume thinking about this insane plan of building my own full-size biplane.
And yet, here we are. I've found my new house, and I managed to find one with a 2-car garage that was ripe to be converted into a workshop. That process has taken far longer than I wanted it to, but is nearly coming to an end as I wait for the new garage door to be installed -- the whole COVID-19 situation means I'll probably be waiting for a while, though.
When I left off on the project, I felt that my next logical step was to profile the spars, and start assembling a wing. I had the ribs built, and all the compression tubes. I hadn't yet ordered the cross-brace wires, but I've still got that shopping cart loaded up at Aircraft Spruce and ready to go. I had found all the internal wing brackets in a Ken Brock kit on Ebay.
However, there was a significant piece missing. The wedge blocks.
Long story short, the Marquart Charger has a very classy-looking 10° sweep to the wings, but all the ribs and bits that go inside are arranged parallel to the fuselage. This means that you have to make up that 10° difference somehow. This is where the wedge blocks come in.
The use of the wedge blocks is pretty obvious. For instance, in the diagram below, you can see how the wedges, in green, are used to make a 90° surface against the wing spar, shown in blue:

So, that made a lot of sense to me. Wedges, cool.
Then my eye would always trace back to this cyclopean horror:

I had no idea what this thing was trying to tell me. For years, I would see it, and immediately get confused. It looked for all the world like a single piece of wood, that I was somehow supposed to cut up to form all those wedges, and it just boggled me to no end. How do you cut that -238 piece from the corner of the -239 piece? Wouldn't it leave a huge gap? How are you supposed to cut all those angles without the saw taking out its kerf and leaving you with undersized pieces? It just absolutely confused me.
Finally, shop nearly done, but not quite done enough to go around cutting thousands of dollars worth of spar material and assembling wobbly half-completed wing structures which might need to be moved (inviting any number of broken wing ribs), I decided to bite the bullet and ask for help with this wedge horror. Not that I have been shy about asking for help before, but it's always a bit of a struggle to admit that I don't understand something that everyone else seems to get.
So I fired up a graphic editor and cut out the section of plans I'd be posting about, but something about it made me pause. Suddenly, out of the blue, the picture that had for all time looked like a white vase on a black background snapped around, and became two human faces, facing each other with a white space between them.
It wasn't showing a single piece of wood. It was showing all the wedges overlaid on top of each other. My brain felt like it was going to explode.
Instead of drawing out six side profiles and six face profiles, with the attendant measurements for each, Ed Marquart had done the sensible thing and drawn them together to save space and drawing effort. This sudden understanding was, I must say, a huge relief.
Here is an annotated diagram with improved dimension lines, which shows in red how to interpret the dimensions for making a -239 wedge:

Looking over the plans and dimensions, it looks like I've probably got enough off-cut spruce to make most of the larger wedges, though I'm going to order some 1/4" thick stock to make the -238 wedges, since there are so many of them.
Now, I just have to figure out how I'm going to cut all these extremely sharp angles. I've started on a sled for the table saw, similar to this design. I don't have any MDF lying around at the moment, so I'm starting with some not terribly good plywood as a base. I'm pretty sure a sheet of MDF is in my near future, but it's good to experiment with the technique for the moment.
Honestly, I'm just excited to have something I can do during COVID times that doesn't require a helper, like the spars, and can be accomplished with the shop in a relative state of disarray while I wait for a new door. Progress is finally being made again, and it's a gratifying feeling after such a long delay.
Posted at 13:37 permanent link category: /charger
Sun, 16 Feb 2020
Thoughts on the Reality of Fantasy
Starting last year, I suddenly got back into role-playing games after a nearly 25 year hiatus. In college, I played all sorts of RPGs (all this is the tabletop variety, not videogames), and dropped the habit once I got into the "real world," on the presumption that no one would have the time for it.
In any case, I now find myself DMing a campaign of Dungeons and Dragons, and playing in another, both of which came together more or less because I waved the "I want to play RPGs" flag on Facebook, and got a huge response.
One of the things that's come to my attention is that we apparently experience events from the games as being in some way real. I have operated on this assumption as I run my game and play in the other, but it had remained an abstract thought until this last weekend.
In the game where I'm a player, my character, Cass, is a 17 year old half-elf who has lived her last ~4 years as a street urchin, after escaping from an abusive home siutation. Half-elves are generally outcasts, being neither fully human nor fully elven. A couple years ago, she realized that she was developing magical powers, the source of which is completely unknown to her. In game-mechanics terms, she's a wild-magic sorcerer, which means that her spellcasting comes from within, and may occasionally spark chaotic, unexpected magical effects.
Critically, she's quite small: under 5' tall, about 90 lbs (with a healthy weight of about 110, which she'll probably reach with sufficient food), and not terribly strong, with a strength score of 8 on a scale of 3-18, where 10 is average.
As I play her in the game, I've been doing what I felt was a reasonaby good job of getting into the mindset of someone who is not at all like me, in temperament, physical presence, or outlook. What would an Ave Rat do? (For readers not from Seattle, Ave Rats are the homeless teens who hang out on the street near the University of Washington campus, colloquially known as "The Ave.")
In yesterday's session, we found ourselves at liberty in a new city in our fantasy world (a homebrew world that my co-DM Jordan and I are creating together). We spotted an urchin who looked like they were being chased, who disappeared into an alley, but no one was chasing them. Curiositiy piqued, Cass followed, but found the dead-end alley empty. Nyx, Cass's friend and fellow street urchin, found a tunnel that they may have disappeared into, and we followed it, popping out into a storeroom. We didn't find anything, but made a mental note that we might want to check it out further.
Later in the day, with fresh mysteries to solve, Nyx and Cass decided to go check out the storeroom again, to try to find any clues our previous urchin may have left behind. At Cass's insistence, we kept the remainder of the party away, so as to be more sneaky and quiet.
Sneaking in was trivial, and once inside, we rolled terrible Stealth rolls, and pretty much immediately someone came to check out the noise. A man unlocked the door and walked in, spotting us as soon as he was in.
With the heart-racing feeling of a cornered animal, Cass darted forward and attempted to hit the man with a shocking grasp attack, which, if it hits, delivers a surprising amount of force -- this is the only spell she's confident she can cast every time. Her plan was to surprise him then dart away down the tunnel, hoping to forestall any attempt to follow them.
The attack missed. The man grabbed her and she squirmed and tried (and failed) to shocking grasp him over and over until he completely immobilized her. He didn't realize what she was trying to do, taking it to be normal attempts to kick or punch rather than a magical attack.
During this time, Nyx fortunately kept her head, and persuasively argued that we weren't trying to steal anything, and had in fact been trying to help the urchin we'd seen before, who seemed to be in distress. Cass was enveloped in a fully-developed fight-or-flight response, and utterly unable to move. The man, and moments later, his boss, were willing to listen to Nyx, and after Nyx tried to calm Cass a bit, set down the struggling girl. Cass and Nyx demonstrated the previously-unsuspected tunnel into the storeroom, and the shop owner took us to her office.
The discussion was brief, and essentially consisted of "Don't break into people's shops, please." She let us go thanks to Nyx's silver tongue, and we were escorted to the store's front door, passing the varied goods present in any general store.
This sequence of events, at the slightest remove, was patently stupid. I, a 40-some year old man, would never, ever act in this way. But in the moment, with my mind placed as firmly as possible into the brain of an imaginary 17 year old street urchin, the choices were clear as day: the man was a threat, she knew she was caught where she wasn't supposed to be, and her only thought was how to escape right now. She was overconfident about her ability to use shocking grasp, sure that it would fire off every time she tried to use it, forgetting that you also have to hit your target for it to work.
After we were released from the shop, Cass was shaking with reaction, the immobilization by the shop hand the absolute worst response he could have made, from her point of view -- it recalled her pre-urchin past, and dropped her into the horrible mental space that called into being. She had to sit down in the street and let it all wash over her for a few minutes, before she could really continue on.
We stopped the session shortly after those events, out of time for the day. I went off to my next event, a friend's birthday party. As I sat waiting for others to arrive, having gotten to the bar early, I realized: I was shaking. Not a lot, but I was not my normal steady-feeling self.
I thought back on the past hour, and realized that I'd also had tensed shoulders as my character was being restrained against her will, and was feeling that shaking even then. I had described the character's physical reactions because I actually felt them in myself. Only an echo of the character's reactions, to be sure, but I felt them. Somehow, I had experienced a trauma trigger reaction even though I, the player, never had the trauma in the first place, and didn't experience the triggering event "for real."
As I self-consciously examine my memories of the event, the mental image of Cass, caught up in the arms of a comparatively burly shop hand is much clearer than the sight of my DM or the other players, at that moment. I don't see through her eyes; it's a disembodied memory, as if I were watching a movie, but the slightly dusty storeroom, his leather apron, Nyx's pleading voice, the sense of mindless, wild-animal panic: these are all more "real" than the reality that was in front of my eyes.
This is hardly a revelation, of course. I linked a study above that suggests empirically that this is all fairly common among RPG players. Even so, it hints at the awesome power latent within role-playing situations. We have the opportunity to become heroes in a way the real world does not offer, except on rare occasions (magical abilties aside, of course). We can experience crushing defeats and bounce back. We can be the people reality doesn't allow us to be.
Dungeons and Dragons is experiencing a resurgence at the moment, and I suspect that an element of that newfound popularity is this very ability to do heroic things that reality denies us. There are many factors, of course, but the chance to experience things that are otherwise unaccessible is surely one of them.
Posted at 18:59 permanent link category: /misc
Thu, 16 Jan 2020
I'm nearing the final phase of my garage refurbishment, which means that I now need to mud the drywall. Nothing fancy, just plugging up the cracks to complete its ability to resist fires. However, this means that I need it to be at least 55° F inside the garage, and to maintain that for roughly 24 hours while the mudding compound dries/cures.
Of course, the weather in Seattle just took an Arctic turn, and the first half of this week was entirely below freezing, with many (largely unfulfilled) threats of snow. However, it's still been in the 20s.
Clearly some supplemental heat was called for.
I have a 1500 watt milkhouse heater, though I know from past experience that it doesn't do a whole lot for even a one-car garage sized space in the winter. Imagining that it would help with a two-car space with an uninsulated roof (that's a project for a different day) was ludicrous.
So, I loaded up the website of my favorite big box store, and started trolling through reviews of 4000-5000 watt 240v heaters.
I noticed an odd trend: every heater would have a surprisingly large proportion of reviews that read roughly like this:
This heater is worthless. Turned it on, and it barely blows any warm air at all. Save your money.
After reading enough of these, along with some other reviews that suggested maybe the complainers were plugging into 120v instead of 240, I found my curiosity piqued. Surely, thought I, if you plug a 240v heater into 120v, you'd get half the performance, right?
Then I remebered: Ohm's Law is a tricky bugger. What if it was a quarter?
Ohm's law explains the basic behavior of electrical circuits with resistive loads, such as our heater. It says that the voltage (in volts) is equal to the current (amps) times the resistance (ohms):
V = I * R
You can rearrange this to figure out any of the terms. So I wanted to know what the resistance of my chosen unit was. I knew it was a 4000 watt heater, that it ran on 240v, and that the spec sheet said it consumed 16.7 amps of current at 240v. Plugging those numbers in to Ohm's law to figure out the resistance, we get:
R = 240 / 16.7
R = 14.37 ohms
Cool. So now, what happens if we know the voltage and resistance, but want to find out the current? This is important because power (watts) is determined by the voltage times the current. This will determine if the power in watts is halved at 120v, or does something else.
So, calculator out, and we figure:
I = 120 / 14.37
I = 8.35 amps
Oooh, lookie there! It no longer draws 16.7 amps, instead drawing just half that amount. The resistance of the heater hasn't changed, but half the voltage actually pulls half the current. That means that indeed:
120 volts * 8.35 amps = 1002 watts
Compared to its full-voltage spec, the massive 4000 watt heater will only put out a thousand watts when plugged into a normal 120v circuit. Less than a hair dryer, and there are probably real-world inefficiencies that make the 240v heating element even less effective at 120v than the pure math would suggest.
And this is why you always check the specs of the thing you're buying, and don't just wire up a new outlet to fit the weird plug of this big appliance you just got (I can virtually guarantee you every reviewer who complained of lackluster performance made two trips to the store: one to pick up the new heater, and another grumbling and cursing to buy the funny-shaped outlet the new heater demanded, stupid heaters).
Posted at 15:22 permanent link category: /misc
Wed, 16 Oct 2019
I'm building up a new campaign world for a D&D game I'll be running soon, and I have finally produced some work from that effort which I can share without spoiling anything.
The initial adventure location is in a Slavic-inspired region of this world, and I needed a folktale for one of the situations I was setting up. As is usual in these cases, I just started writing to see what would come out -- all I knew was the title, and one of the pivotal moments in the story. It's always fun to see what my feverish little brain comes up with in these cases.
Thus, I present you the quickie first-draft story of the Witch in the Woods, written roughly in the style of traditional folktales:
Once, long ago, there was a young girl named Maria Antipova, who had an infant brother, Leonid. Their parents had died, and they were living as best they could in their parents' cottage in the woods. Maria would gather firewood during the day, and sell or trade it to local villagers in exchange for food. It was a hard life, but they were surviving, and the local villagers gave them a good rate for the firewood, for they felt sorry for the pair.
One day, a withered old woman dressed in fine traveller's clothes came to their door, and begged for some food as a weary traveller. Maria invited her in, and gave the old woman what she could. It was meager, just porridge and a very small mug of warm milk, and she apologized for the poor fare. The old woman demanded more, having become very imperious once she had stepped over the threshold. Maria gave her more milk, but the old woman was not satisfied. Leonid started crying, for Maria had taken food away from him to give to the old woman. She became angry at the baby's cries, and said, "Silence that whelp, or I will sell him to the fairies!" Maria tried, but Leonid was so hungry, and he would not stop crying.
The old woman could not be pleased. Finally she demanded, "Give me a bed to sleep in, for I am tired, and give me wax to plug my ears against that child's screeching!" Maria gave her her own bed, and a piece of wax she was used to chewing when the hunger was great. The old woman went to sleep in Maria's bed, and Maria stayed with Leonid, consoling him to no avail. Eventually she fell asleep holding the baby, perched atop the little milking stool. The fire died down to embers, and the night passed.
In the morning, Maria awoke to find that the old woman was gone, and so was Leonid. Frantic, she searched through the cottage but to no avail: Leonid was nowhere to be found. She ran out of the cottage to the path, and called out for Leonid, but there was no answer from the woods. Just then, a woodcutter was passing with his axe, and he heard Maria's calls. "Who do you call for, girl?" he asked. She recognized him as one of the villagers would would trade milk or butter for wood. "My brother is gone! An old woman was here, and when I woke up this morning, Leonid was gone, and so was she!"
The woodcutter said, "I saw an old woman riding a butter churn through the air this morning! She was holding something in her hands." Maria thought this must be the old woman who had spent the night, and asked, "Was she wearing fine clothing?" The woodcutter said she was, then said, "She is Taraga, the Witch in the Woods. I'm afraid your brother is gone, never to be seen again." Maria asked him where the Witch lived, and he said she lived over the mountains in a wood far away. "You had best not go to her, for the way is dangerous and she will eat your brother before you can reach her."
Maria was undeterred, and gathered her few things into a cloth and cast it across her shoulder. She tucked her father's meat cleaver into the waistband of her dress. Before she could set out, there was a knock on the door, and a kindly villager woman stood without. She said, "Maria Antipova, my husband tells me you are going to Taraga, the Witch in the Woods. Take this shawl, and it will keep you warm. And take this apple, so that you do not hunger. My husband sends you his stoutest boots, so that your feet can travel without tiring." Maria accepted the gifts gratefully, and set out.
The way was hard, the path rocky. Soon she was climbing up a mountain, and clouds gathered into a storm. "Maria Antipova!" said a voice from the clouds, "Go no further, or I will sweep you from this mountain!" The storm rained down on her, and Maria put up her new shawl, and stayed completely dry, for it was a magic shawl. The mountain grew ever steeper, but Maria continued on, baring her teeth into the storm. "I am not afraid of you, Taraga!" she called into the sky. The clouds thundered in response.
Soon the mountain was past, and Maria was slogging through a swamp. She tucked up her skirts and pressed on over the boggy ground, the boots keeping her feet dry, for they were magic boots. Soon the swamp had passed, and she was climbing over great boulders, but she felt she was getting closer. As night closed in, she made a small fire between two boulders and ate her apple until she was no longer hungry, but the apple was still whole, for it was a magic apple. The fire died down to embers, and Maria tried to sleep, but the ground was hard.
She heard a snarl near to hand, and rose again, crying out, "Who is there?" A wolf's face appeared out of the gloom, and said in the old woman's voice, "Maria Antipova! Go no further or I will eat you up, as surely as I will eat up your tiny brother!" Maria stood and held out her father's meat cleaver. She said, "I am not afraid of you, Taraga, and I will rescue my brother whether you like it or not!" She swiped at the wolf's face, and it ran away.
The next morning, she made her way past the boulders, and came upon Taraga's hut. It was surrounded by a fence surmounted with children's skulls. "So, you have found me, Maria Antipova," said Taraga. "Soon I will add your brother's skull, and maybe even your own, to my fence." Struck with an idea, Maria said, "Let me in, for I am weary with travelling!" The old woman let her in to the hut, where Maria saw Leonid lying in a baking pan in front of the oven, which was heating up. "Give me food, for I am hungry!" said Maria Antipova. Taraga grimaced and hissed, but gave Maria what food she could find: a cabbage and an onion. Leonid woke up and started crying at the loud voices in the hut. "Silence that child, or I shall steal him and sell him to the fairies myself," said Maria Antipova, and the old woman was forced to comfort Leonid. "Give me a bed, for I am weary with travelling," said Maria Antipova, and the old woman was forced to give up her bed to Maria. "Now leave me to sleep," said Maria Antipova, and when the old woman turned around to leave Maria to sleep, she cut her in two with the cleaver.
Gathering up her brother, Maria gave him the apple to eat and fixed the shawl about him so that he would stay dry. Together, they left Taraga's hut, and walked back to their own cottage in the woods, where they lived to a ripe old age and were happy with each other.
Posted at 21:31 permanent link category: /rpg
Categories: all aviation Building a Biplane bicycle gadgets misc motorcycle theater